Virtual Beareoke - HowTo
🐻 If you want to sing:
- Write "singer" into the chat and you will be put on the list. The hosts will notify you when it's your turn.
- Please check out the technical preparations further down on this page. The hosts can also walk you through the steps before you start singing.
- You can sing multiple times, but please wait until you've sung before you put your name on the list again.
- As we get closer to the end of the session (the exact time depends on how many singers there are), the hosts will announce "last call". When that happens, everybody gets the opportunity to add their name one more time before the list is closed.
- Participants are free to swap their list positions with each other, just make sure to notify the hosts of any changes you'd like to make
🎵 Picking a song
- You can sing any song you'd like. Unless you'd like to sing acapella, you might want to look up a karaoke track or instrumental version of the song.
- You can find karaoke versions on YouTube through KaraokeNerds
- If seemingly no karaoke track or instrumental version of your song exists, you can try making your own by using AI tools like https://uvronline.app/ai or https://vocalremover.org/.
- If all else fails, you can of course also just sing over the original track.
- If you picked a very long song (over 10 minutes), it's common courtesy to clear it with the other participants beforehand, to make sure everybody gets a fair amount of singing time.
⚙️ Technical Preparations
If you are on a Mac, make sure Zoom has all the permissions to share audio or video - see this article
Now we need to make sure to adjust your Zoom settings so that the Zoom features that are optimized for speech don't ruin the musical experience. Follow these short instructions:
On the Audio button in the bottom left of the screen is a small arrow icon, when you click on that it will open a pop-up menu that lets you change some audio settings quickly. We will refer to this as the "Quick Audio Menu".
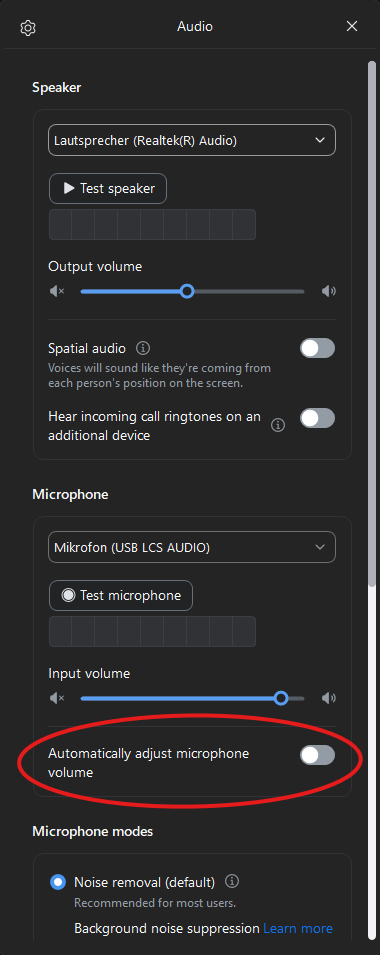
First, select Audio Settings in the Quick Audio Menu.
In the dialog that now opens, turn OFF Automatically adjust microphone volume:
After this, you can close the audio settings. For the following instructions, you can change your Microphone Mode between "Noise removal (default)" and "Original sound for musicians" directly in the Quick Audio Menu:
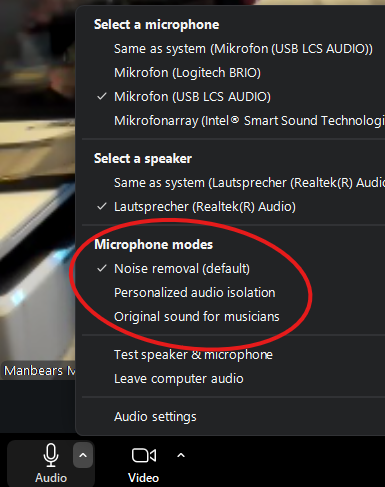
"Noise removal (default)" is optimized for speech and will filter out any audio that does not sound like talking - which means that music playing in the background and even specific styles of singing will not be audible for the other participants of the Zoom call because Zoom thinks they are background noise. "Original sound for musicians" however will let you play background music and will be less problematic for singing as well, provided your internet connection has enough bandwidth.
🎤 When it's your turn:
There are two methods to share your audio. The no-headphones method is a little easier to use and has no audio syncing issues, but the headphones method usually gives you better sound quality.
The "Original Sound for Musicians" option may take up more bandwidth and is optional for the headphones method, but it's pretty much necessary for the method without headphones. The general idea is that you turn original sound on before you start singing and turn it off again once you're done with a song. We sometimes jokingly refer to that option as "Original Sin", don't let that confuse you. 😉
🚫🎧 Without headphones:
- Select "Original Sound for Musicians" as your Microphone Mode in the Quick Audio Menu.
- Feel free to take some time to check your volume and audio settings with the other participants.
- Play the karaoke track through some speakers and then sing so that both the background track and your voice get picked up by your microphone.
- Once you're done singing, change the Microphone Mode back to "Noise removal (default)". Otherwise it might cause a feedback loop with the other participants.
🎧✔️ With headphones:
-
Click the Share button at the bottom of your Zoom window

-
This will open a pop-up menu. In the tab navigation on top, select Advanced, then pick Computer Audio in the tile view and confirm by clicking the Share button at the bottom of the dialog.
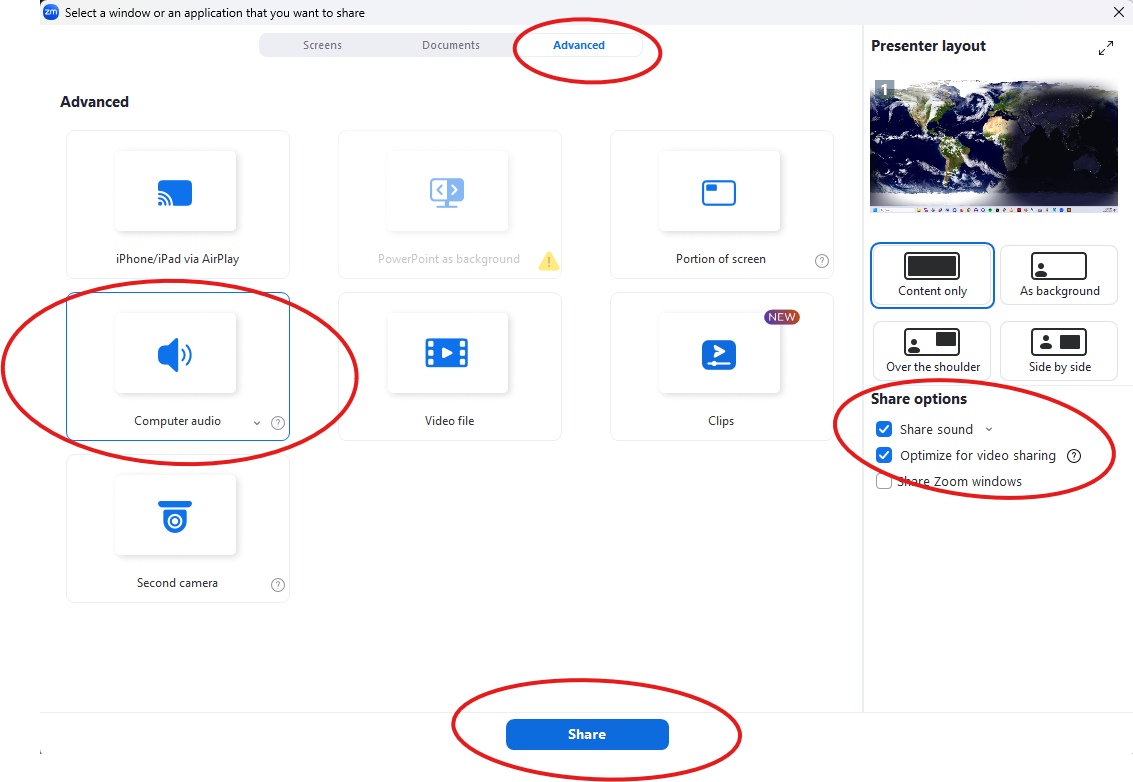
Alternatively, you can share your entire screen or any application window, but in that case, make sure you also enable the "Share sound" checkbox in the column on the right (and if you want to share a video, also click "Optimize for video sharing"). -
You should now see an extra tab for your shared audio at the top of your Zoom window called "My computer sound".

- Optionally, to make sure your singing goes through unchanged, you can change your Microphone Mode to "Original sound for musicians" (see above). This may not be necessary for all songs.
- Open your karaoke track in another window. If it's a YouTube video, use the volume slider on YouTube to adjust the volume. Usually it sounds good if you set it to around 60-75%.
- Feel free to take some time to check your volume and settings with the other participants.
-
Once you're done singing, change the Microphone Mode back to "Noise removal (default)". Also click on the "My computer sound" tab at the top of your Zoom window and then click the "x" to close the tab and stop sharing.

⚠️ Please note:
In some cases, when using the headphone method and depending on network latency, your singing and the background music might appear out of sync for individual listeners.